Follow daniellexo's tip on finding a font and Step 1 to find a picture/graphic (not stolen).
Hint for fonts: http://www.dafont.com/
GIMP Step 2.
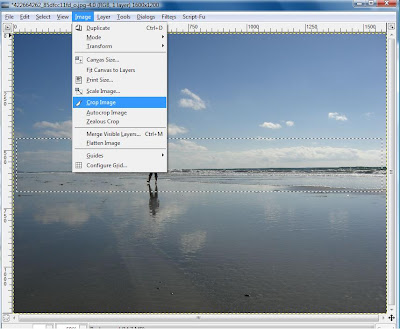
Crop your image by clicking the "select rectangular image" icon which is the top left icon on GIMP's tool panel.

Once you selected the icon go to your image and draw a wide rectangle, keep in mind this will be the area you are cropping to.
Step 2 a: On the menu bar, select Image, Crop Image

GIMP Step 3
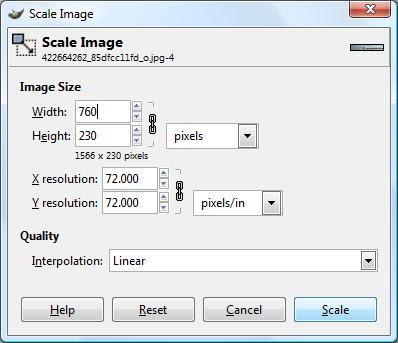
Scale your image to the Etsy banner width 760.
On menu bar select Image, Scale Image.
In the pop up box enter 760 for the Image width.
Click the button "Scale".

GIMP Step 4
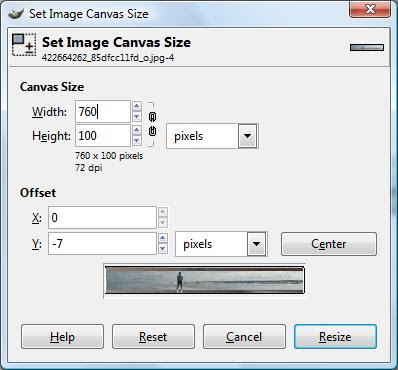
Creating the Etsy banner length of 100.
On menu bar, select Image, Canvas Size.
In the pop up box, click on the image of the chain link that connects width and height together.
Now the chain will look broken.
Change the height to 100.
You will see your image in the preview box of this screen, move your image around to make sure you are getting the part of the image you want on the canvas. When satisfied click the button "Resize".

GIMP Step 5
Add some text, like your shop name....
In GIMP tool panel, select the T icon, third row, far right. Now select the area on your image where you want to place text. A GIMP text edit will open, enter your text here. Do not close the editor yet.
Go back to the GIMP tool panel, choose your font style, font size, and color.

P.S. You can later move the text around my selecting the arrow icon in second row, second from right.
Final Step - Save and Upload
NOTE:
I didn't try out all the extras for growing images and such but GIMP does have the magic wand, see GIMP tool panel, icon first row forth from the left.
After you are done playing and editing you are ready to upload! Make sure you save your new banner to your PC!!! File, Save as.. Chose a name! Remember you you saved it!
Login to Etsy, goto Your Etsy, Appearance, under Banner select Browse. Find and select the image you just saved, select Open. Select orange button "Save changes".
Your done! Enjoy your banner!!!


10 comments:
Thanks for inform.
I like your banner in Etsy.
Thank you. ;)
Rarearthceramics said thank you for the help! :)
Thank you so much. I didn't know how to do this before. Its great!!!!
Thanks for the tutorial. I made a new banner for my Etsy shop.
http://massmans.etsy.com
WOW! Am I glad I found your tutorial! I have been going crazy these past few days trying to figure out GIMP!
[... ] is other useful source of information on this subject[...]
Thank you so much for this tutorial. I've made banners with PS, but don't have access to it right now.
Learning GIMP, but I don't find it intuitive at all. Your steps made this easy!
Peace, Judi
http://judifitzpatrick.etsy.com
Superb website you have here but I was wanting to know if you knew
of any discussion boards that cover the same topics talked about here?
I'd really like to be a part of online community where I can get suggestions from other knowledgeable people that share the same interest. If you have any recommendations, please let me know. Thanks!
My blog post: bmi calculator for women
Hello!
Do you use Twitter? I'd like to follow you but couldn't find
the button!
More to come on my website page Golf Putting ()
Post a Comment